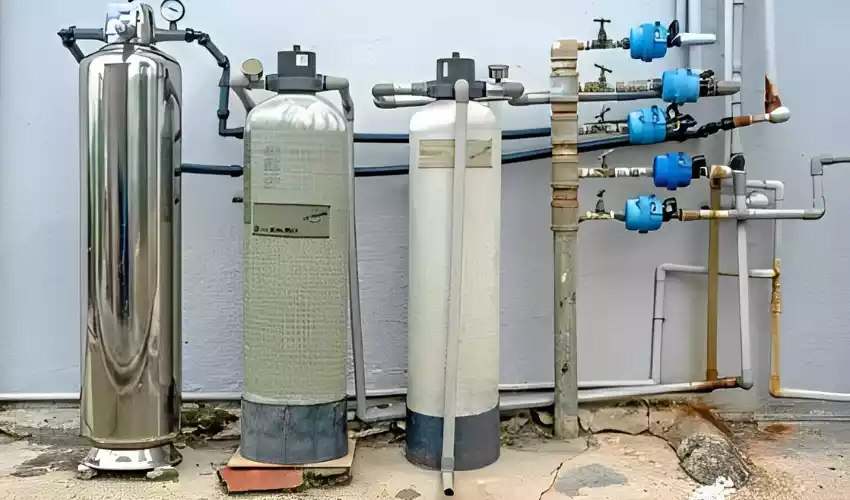
Clean water is a vital element for a healthy life, and ensuring its quality is paramount. A whole house water filter system becomes a necessity, especially for homes sourcing their water supply from private wells. Filtering water at the point of entry, these systems enhance the quality of water used for both consumption and household chores.
Whole house water filters excel in removing contaminants common in private wells, including sediments, iron, hardness, bacteria, and other harmful substances. Implementing such a system not only safeguards health but also enhances the taste of water and prevents potential damage to appliances.
Private wells often come with unique challenges – variations in water quality, fluctuating levels of contaminants, and the need for regular maintenance. A whole house water filter installation can mitigate these concerns, offering a reliable solution for safe and clean water.
Step 1: Assess Water Quality
Before installing a water filter, it’s crucial to evaluate the quality of water. Private wells, being directly influenced by the local ecosystem, may contain a variety of contaminants. A comprehensive water test kit can help identify these elements, ranging from bacteria and nitrates to heavy metals and hardness. The results of this test will help in choosing the most appropriate filter.
Common Contaminants in Private Wells
- Sediments: These include sand, silt, clay, and organic particles.
- Bacteria: Harmful bacteria, like E.coli, are common in well water.
- Heavy metals: Iron, lead, and arsenic can pose serious health risks.
- Hardness: High levels of calcium and magnesium can affect appliance performance.
Step 2: Gather Necessary Tools and Equipment
Before starting the installation process, having all the right tools and equipment on hand ensures a smooth and hassle-free experience. This section provides a comprehensive list of what you might need, along with brief descriptions for clarity.
Essential Tools:
- Pipe Cutters: These are designed to make clean cuts on your pipes, ensuring a tight fit when connecting your filter.
- Wrenches: Useful for tightening and securing connections.
- Teflon Tape: This tape, when wrapped around threaded pipe connections, ensures a watertight seal and prevents leaks.
- Plumbing Connectors: These connectors, like unions or couplings, help to join sections of pipe to the filter system.
Additional Items Based on Filter Type:
- Mounting Bracket: This provides support and secures the filter system to a wall or supporting structure.
- Screws: Necessary for attaching the mounting bracket.
- Pressure Relief Button: Some filter systems have this button to release pressure, making filter changes easier.
Safety Precautions:
While the installation process is generally straightforward, always prioritize safety:
- Turn Off the Water: Before you begin, make sure the main water supply is turned off to prevent any sudden gushes of water or potential accidents.
- Safety Goggles and Gloves: Protect your eyes from any debris or sudden water spurts, and your hands from any sharp or rough surfaces.
- Work in a Well-Lit Area: Proper lighting ensures you see what you’re doing, reducing the risk of mistakes.
- Fire Extinguisher: If you are soldering pipes, it’s crucial to have a fire extinguisher nearby in case of unexpected flames.
Step 3: Choose the Ideal Location
Determining the best location for your filter is pivotal not just for optimal functioning but also for ease of maintenance.
Proximity to the Main Water Line: Installing close to the entry point ensures all water entering the home gets filtered.
Accessibility for Maintenance: Position the filter in a location where it can be easily accessed for routine maintenance tasks such as cartridge replacement.
Environment and Temperature Considerations: The system should be protected from direct sunlight and freezing temperatures. If the installation site is outside, consider insulating the system during winter months.
Step 4: Prepare Installation Site
Setting up the area correctly can save time and prevent complications:
- Turn off the Water Supply: This prevents water from flowing out while you’re working.
- Drain the System: Open taps to release any pressure and let out residual water.
- Mark the Pipe: Clearly identify where the filter will be placed.
- Clean Pipe Ends: After cutting, ensure pipe ends are smooth and free of burrs for a seamless connection.
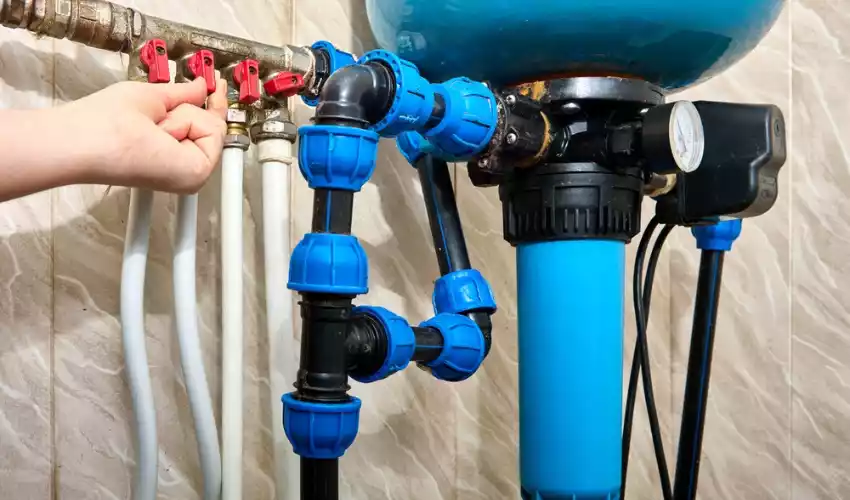
Step 5: Install the Filter System
A step-by-step guide to successfully installing your system:
- Attach the Filter Assembly: Securely connect the filter to the mounting bracket.
- Connect Inlet and Outlet Ports: Ensure that you’re adhering to the directional flow indicated on the filter.
- Seal Connections: Use Teflon tape on threaded connections for a watertight seal.
- Secure to Wall: Use durable screws to hold the system in place. Ensure it’s level.
Post-Installation Check: After setting everything up, inspect all connections to ensure there’s no potential for leaks.
Step 6: Test the System
Ensuring the system works as intended:
- Initiate Water Flow: Turn on the supply slowly and monitor for any issues.
- Leak Detection: Check all connections. If there’s dripping, tighten the affected areas.
- Flush the System: Let water run through the filter for a few minutes to clear out any debris or manufacturing residues.
Maintenance Tips
Proper care can significantly extend the life of your system:
- Routine Checks: Regularly inspect for any signs of wear, leaks, or damage.
- Filter Replacement: Depending on your water quality and consumption, establish a routine to change the filter cartridge. This typically ranges between 3 to 12 months.
- System Cleanup: At least once a year, clean the system components to prevent bacterial growth or mold.
Benefits of Filtered Water
Why go through the effort of installing and maintaining such a system?
- Consistent Quality: Regardless of fluctuations in source water, you’ll always have clean water.
- Health Benefits: Removal of contaminants protects you from potential health risks.
- Cost Savings: Reduce the need for bottled water and extend the life of your water-utilizing appliances.
Common Challenges and Solutions
Anticipate and address typical issues:
- Filter Size Mismatch: Ensure you buy a filter size matching your home’s water flow rate.
- Reduced Water Pressure: This might indicate a clogged filter. Regular checks and timely replacements can help.
- Occasional Leaks: Regularly inspect connections and seals. Tighten or replace as needed.
Frequently Asked Questions
Q: How often should I change my whole house water filter?
A: It depends on the quality of your water and the filter’s capacity. However, most manufacturers recommend changing the filter every three to six months.
Q: How can I increase the lifespan of my water filter?
A: Regular maintenance, such as checking for leaks, monitoring water quality, and timely replacement of the filter cartridge can help prolong the lifespan of your water filter system.
Q: Will a whole house water filter affect my water pressure?
A: Typically, a well-sized water filter will not significantly affect your home’s water pressure. If you notice a drop in water pressure, it may be a sign that the filter cartridge needs replacing.
Conclusion
The assurance of safe, clean water flowing from every tap is a major relief for homeowners. With the right tools and a bit of patience, installing a whole house water filter can be a successful DIY project.
Emphasizing the benefits of filtered water, from health advantages to enhanced appliance lifespan, the value of installing a whole house water filter is clear. While common challenges may arise, with diligent problem-solving, these can be effectively addressed.
Being proactive about water quality is an investment in your health and home. With regular maintenance, your water filter system will serve you well, ensuring that every drop of water you use is clean and safe. Enjoy the peace of mind that comes from knowing your water is of the highest quality.